Jun 09•11 min read
Run a Stacks Testnet Node Translation - Korean
Translated by Hacastle aka Seungsha
Run a Stacks Testnet Node
Stacks 테스트넷 노드 실행하기
The Stacks 2.0 testnet is currently in development. As part of the testnet, you can run a node and connect it to a public network. This guide will walk you through downloading and running your own node in the testnet network.
현재 Stacks 2.0 테스트넷은 개발 중에 있으며, 테스트넷을 통해 노드를 운영하고 퍼블릭 네트워크와 연결해보실 수 있습니다. 이번 가이드와 함께 여러분들이 테스트 네트워크 상에서 노드를 다운로드하고 실행하는 방법에 대해 알아보겠습니다..
• Prerequisites
전제 조건
• Download and install the stacks-blockchain repository
stacks-blockchain 저장소를 다운로드 및 설치하
• Run your node
노드를 돌리
• Running a miner
채굴기 돌리기
• Creating an optimized binary
최적화된 바이너리 생성하기
• Enable debug logging
디버그 로깅 활성화시키
Prerequisites
전제 조건
Note: If you use Linux, you may need to manually install libssl-dev and other packages. In your command line, run the following to get all packages:
참고: Linux 운영체제를 이용하신다면 libssl-dev 를 포함한 다른 패키지들을 수동으로 설치해야 합니다. 커맨드 라인에 다음의 커맨드를 입력하여 필요한 모든 패키지들을 설치합니다.
sudo apt-get install build-essential cmake libssl-dev pkg-config
Ensure that you have Rust installed. If you are using macOS, Linux, or another Unix-like OS, run the following. If you are on a different OS, follow the official Rust installation guide.
Rust가 설치되어 있어야 합니다. MacOS, Linux, 혹은 다른 Unix와 같은 운영체제를 이용하신다면 다음의 커맨드를 입력하세요. 그 이외의 운영체제를 이용하신다면 official Rust installation guide 를 따라주세요.
curl --proto '=https' --tlsv1.2 -sSf https://sh.rustup.rs | sh
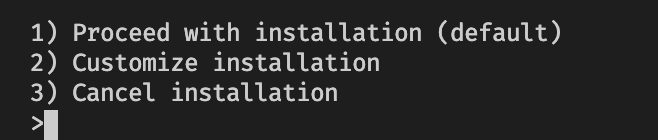
If Rust is already installed, you might see this prompt. Select ‘Proceed with Installation’ to make sure you have the latest version installed.
만약 Rust가 이미 설치되어 있다면 다음과 같은 프롬프트를 확인하실 수 있습니다. ‘Proceed with Installation' 을 선택하여 최신 버전이 설치되어 있는지 확인해 주세요.
In case you just installed Rust, you will be prompted to run the following command to make the cargo command available:
Rust를 설치 완료한 후, cargo 커맨드를 사용하기 위해 다음의 커맨드를 입력해 주세요.
source $HOME/.cargo/env
Download and install the stacks-blockchain repository
stacks-blockchain 저장소를 다운로드 및 설치하
Next, clone this repository:
다음으로, 이 저장소를 복제하세요.
git clone https://github.com/blockstack/stacks-blockchain.git
cd stacks-blockchain
Install the Stacks node by running:
Stacks 노드를 다음 커맨드를 입력하여 설치하세요.
cargo install --path ./testnet/stacks-node
Run your node
노드 실행하기
You’re all set to run a node that connects to the testnet network.
이제 테스트넷 네트워크에 연결된 노드를 실행할 준비가 되었습니다.
Back in the command line, run:
커맨드 라인에 다음 명령어를 실행하세요.
stacks-node argon
The first time you run this, you’ll see some logs indicating that the Rust code is being compiled. Once that’s done, you should see some logs that look something like the this:
해당 명령어를 처음 실행하면, Rust 코드가 컴파일되고 있다는 표시로 몇가지 로고들이 나타납니다. 완료 후에는 다음과 같은 로그들이 표시됩니다.
INFO [1588108047.585] [src/chainstate/stacks/index/marf.rs:732] First-ever block 0f9188f13cb7b2c71f2a335e3a4fc328bf5beb436012afca590b1a11466e2206
Awesome! Your node is now connected to the testnet network. Your node will receive new blocks when they are produced, and you can use your node’s RPC API to send transactions, fetch information for contracts and accounts, and more.
좋습니다! 이제 여러분의 노드가 테스트넷 네트워크와 연결되었습니다. 이제 여러분의 노드는 프로듀스 될 때마다 새로운 블록들을 받게 되며, 노드의 RPC API를 사용하여 트랜잭션을 전송하고, 계약 및 계정에 대한 정보를 불러오는 작업 등을 수행할 수 있습니다.
Running a miner
마이너(miner) 실행하기
Once you’ve followed the above steps to run a node, it’s only a few more steps to run a proof-of-burn miner on the testnet.
위의 노드 실행 설명을 따른 후 몇 단계만 더 거치면 테스트넷에서 proof-of-burn 마이너를 실행할 수 있습니다.
First, we need to generate a keychain. With this keychain, we’ll get some testnet BTC from a faucet, and then use that BTC to start mining.
첫째로, 키체인을 생성해야합니다. 이 키체인으로 테스트넷 BTC를 얻은 뒤 해당 BTC를 사용하여 마이닝을 시작할 수 있습니다.
To get a keychain, the simplest way is to use the blockstack-cli. We’ll use the make_keychain command, and pass -t to indicate that we want a testnet keychain.
키체인을 얻기 위한 가장 간단한 방법은 blockstack-cli를 이용하는 방법입니다. make_keychain 커맨드를 이용하고 -t 옵션을 추가해서 테스트넷 키체인을 원한다는 것을 표현해줍니다.
npx blockstack-cli@1.1.0-beta.1 make_keychain -t
After this runs, you’ll probably see some installation logs, and at the end you should see some JSON that looks like this:
실행된 후 설치 로그를 확인 가능하며 마지막 부분에 다음과 같은 JSON을 확인할 수 있습니다.
{
"mnemonic": "exhaust spin topic distance hole december impulse gate century absent breeze ostrich armed clerk oak peace want scrap auction sniff cradle siren blur blur",
"keyInfo": {
"privateKey": "2033269b55026ff2eddaf06d2e56938f7fd8e9d697af8fe0f857bb5962894d5801",
"address": "STTX57EGWW058FZ6WG3WS2YRBQ8HDFGBKEFBNXTF",
"btcAddress": "mkRYR7KkPB1wjxNjVz3HByqAvVz8c4B6ND",
"index": 0
}
}
We need to get some testnet BTC to that address. Grab the btcAddress field, and head over to the Stacks testnet website. In the BTC faucet section, past in your btcAddress, and submit. You’ll be sent 0.5 testnet BTC to that address. Don’t lose this information - we’ll need to use the privateKey field later on.
이 주소로 테스트넷 BTC를 받아야합니다. btcAddress를 복사하고 the Stacks testnet website로 향하세요. BTC 섹션에 당신의 btcAddress를 붙여넣고 제출하세요. 그 주소로 0.5 테스트넷 BTC가 보내질것입니다. 이 정보를 잃어버리지 마세요 – 나중에 privateKey가 필요할겁니다.
Now, we need to configure out node to use this Bitcoin keychain. In the stacks-blockchain folder, create a new file called testnet/stacks-node/conf/testnet-miner-conf.toml.
이제 당신의 노드가 이 비트코인 키체인을 사용하도록 설정을 해줘야합니다. stacks-blockchain 폴더에 testnet/stacks-node/conf/testnet-miner-conf.toml 라는 새로운 파일을 생성하세요.
Paste in the following configuration:
다음의 설정값들을 복사해 넣으세요.
[node]
rpc_bind = "0.0.0.0:20443"
p2p_bind = "0.0.0.0:20444"
bootstrap_node = "048dd4f26101715853533dee005f0915375854fd5be73405f679c1917a5d4d16aaaf3c4c0d7a9c132a36b8c5fe1287f07dad8c910174d789eb24bdfb5ae26f5f27@argon.blockstack.org:20444"
# Enter your private key here!
seed = "replace-with-your-private-key"
miner = true
[burnchain]
chain = "bitcoin"
mode = "argon"
peer_host = "argon.blockstack.org"
rpc_port = 18443
peer_port = 18444
[[mstx_balance]]
address = "STB44HYPYAT2BB2QE513NSP81HTMYWBJP02HPGK6"
amount = 10000000000000000
[[mstx_balance]]
address = "ST11NJTTKGVT6D1HY4NJRVQWMQM7TVAR091EJ8P2Y"
amount = 10000000000000000
[[mstx_balance]]
address = "ST1HB1T8WRNBYB0Y3T7WXZS38NKKPTBR3EG9EPJKR"
amount = 10000000000000000
[[mstx_balance]]
address = "STRYYQQ9M8KAF4NS7WNZQYY59X93XEKR31JP64CP"
amount = 10000000000000000
Now, grab your privateKey from earlier, when you ran the make_keychain command. Replace the seed field with your private key. Save and close this configuration file.
이전에 make_keychain 커맨드를 실행했을때 나온 privateKey를 복사하세요. seed값을 당신의 프라이빗 키로 바꿔주세요. 설정 파일을 저장하고 닫으세요.
To run your miner, run this in the command line:
여러분의 마이너를 돌리기 위해 커맨드 라인에 다음의 커맨드를 실행하세요.
stacks-node start --config=./testnet/stacks-node/conf/testnet-miner-conf.toml
Your node should start. It will take some time to sync, and then your miner will be running!
여러분의 노드가 시작될것입니다. 싱크를 하는데 있어 시간이 조금 소요되며 그 후에는 마이너가 실행됩니다.
Creating an optimized binary
최적화된 바이너리 생성하기
The steps above are great for trying to run a node temporarily. If you want to host a node on a server somewhere, you might want to generate an optimized binary. To do so, use the same configuration as above, but run:
위의 절차들은 노드를 임시적으로 돌릴때 아주 좋습니다. 하지만 어느 서버에 노드를 호스트 하고 싶으시다면 최적화된 바이너리를 생성하시는게 좋습니다. 그러기 위해서는 위와 같은 설정값들을 사용하시되 다음의 커맨드들을 입력하세요.
cd testnet/stacks-node
cargo build --release --bin stacks-node
The above code will compile an optimized binary. To use it, run:
위의 코드가 최적화된 바이너리를 컴파일 할 것입니다. 그것을 사용하기 위해서는 다음을 실행하세요.
cd ../..
./target/release/stacks-node start --config=./testnet/conf/argon-follower-conf.toml
Enable debug logging
디버그 로깅 활성화 시키
In case you are running into issues or would like to see verbose logging, you can run your node with debug logging enabled. In the command line, run:
문제가 있거나 자세한 로그를 보고싶으면 여러분의 노드에서 디버그 로그를 활성화한 상태에서 실행 수 있습니다. 커맨드라인에 다음을 입력하세요.
BLOCKSTACK_DEBUG=1 stacks-node argon